PQ Please!
I will be heading to Antarctica in less than 4 weeks now. I am still awaiting approval from the medical offices of the U.S. Antarctic Program. Before you are allowed to go to Antarctica, you have to prove that you are physically qualified ("PQed" in Antarctica-speak). This means getting physicals, blood tests, dental exams and more. I finally submitted all my forms and now I am waiting.
Outreach in Classrooms
I have also been scheduling visits with local schools to tell them about my upcoming trip to Antarctica. Today I visited two 5th grade classes at Corl Street Elementary School. We talked about the history of McMurdo Station and the work my team and I will be doing there (see our page summary if you need a reminder). We also discussed cool adaptations of polar animals, like Ice Fish, Weddell Seal and Adelie Penguins.
After discussing adaptations of seals and penguins, students tried on blubber gloves--gloves made out of, you guessed it, blubber! Well, really Crisco, but it is close enough. Students dipped the gloves into icy water and then compared them to gloves without blubber. There was a noticeable difference!
 5th Grade students try on blubber gloves at Corl Elementary School.
Extreme Cold Weather Gear
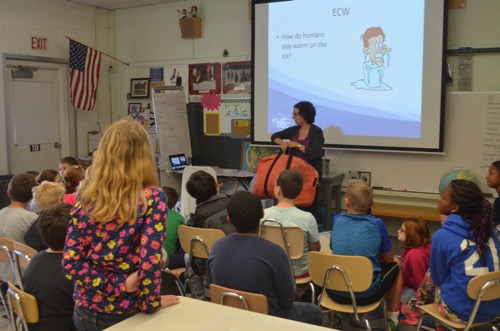
Once students knew what it felt like to be a penguin in icy water, they then got a chance to feel like people in Antarctica by trying on ECW, or Extreme Cold Weather, gear. ECW gear is given to everyone going to Antarctica. I will receive my gear in New Zealand, before I fly to McMurdo Station and will carry the clothes in a big orange bag like the one shown below.
 Michelle Brown talks to 5th Graders about Extreme Cold Weather (ECW) Gear.
Class Question: Get Involved!
Can you guess what is in the orange bag in the picture above? What do you think is included in "Extreme Cold Weather Gear"? Post your answer in the "Ask the Team" box below (You only need to write your first name). The best answer will get a postcard from McMurdo Station!
Teacher Corner
Teachers--want to make blubber gloves for your own classroom? It is simple! Just follow these steps:
- You will need freezer bags (two per glove), Crisco (or any shortening) and Duct Tape. one 48 Oz jar of shortening can make about 3 gloves.
- Lay out two freezer bags. Turn one of them inside out and fit it inside the other one. This will be your "glove."
- Scoop large spoonfuls of shortening in between the freezer bags on one side of the glove. I typically use 10-12 spoonfuls, about 1/3rd of the container of shortening.
- Seal the inner bag to the outer bag on that side. Turn the glove over to the side that doesn't have shortening in it.
- Put 2-3 scoops of shortening in between the outer and inner bags on this layer. Seal the bags together.
- You now should have lots of shortening between bags on one side and a little bit on the other side. Keeping most of the shortening on one side, smooth out the lumps so that the fat is evenly spread out and smooth.
- Place the bag on the table so the thicker side is facing down. Place your hand in the glove and fold the bag over, so that the thick layer covers most if not all of your hand. Crease or leave the bag folded.
- Making sure the bag is completely sealed, tape along the outer edges of the bag and down the folded side, so your glove is roughly the size of a hand. I also tape the end of the glove where it is folded.
You now have a blubber glove! If you would like to see pictures of each step above, go to my science teacher blog.
You can use the gloves for adaptations, to discuss thermal insulation, or other inquiry activities. Here is a great lesson discussing how insulation affects heat transfer and how blubber helps penguins and other organisms survive in icy water.

Comments