This journal is brought to you by...
 This journal is brought to you by...
- Lorelei Scatamacchia and her 3rd grade class at Richland Elementary
- Mrs. Pyland and her 2nd grade class at Riverwood Elementary
- Ms. Brandon and Ms. Safri’s 1st-3rd graders at Lamplighter Montessori School
- Amanda Bomprezzi’s 3rd grade class at Bon Lin Elementary
Data, Data Everywhere
Yesterday we learned where and how we find the seals for our study. Today we will focus on what we do every day – collect data!
But first, we must capture and calm the seal. Do you think it is easy to capture an apex predator, one that’s near the top of the food chain? Especially an animal with teeth like this? Yikes!
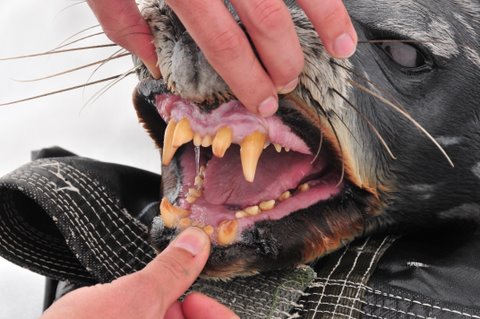 Here’s a close up view of some seal teeth. Don’t they look sharp? Photo credit: Dr. Jennifer Burns, MMPA Permit # 17411
Surprisingly, it’s not as hard as you might think.
Once we find a target seal, we gently capture and calm it so we can start collecting data. The team is very protective of our ‘seal friends,’ and we make sure they are calm while we are gathering our data. Luckily, these seals are not afraid of humans so we can walk right up to one and place the net over the seal’s head. Notice the top of the net is covered in a dark fabric, which covers the seal’s eyes and helps keep the seal calm.
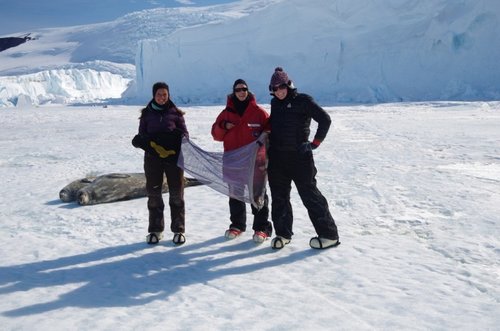 Graduate students (L to R: Roxanne Beltran, Amy Kirkham, Skyla Walcott) holding up the net. Notice Roxanne, far left, holding the part that covers the seal’s eyes. Photo credit: Chris Burns, MMPA Permit # 17411
The bottom part of the net (grey mesh) covers the seal’s flippers, protecting both the seal and research team.
Then, the veterinarian gently administers a sedative to the seal. That means we give the seal a small dose of medicine to keep it calm and relaxed. Doing this also protects the seal and the research team.
Collecting Data
Now it’s time to collect all that data.
Just like you and me, seals need a checkup, too!
What’s one of the first things that happens when you go to the doctor? If your doctor is like mine, you step on a scale to get weighed and stand against a height chart to get measured. We do the same things for the Weddell seals.
Take a look.
Weighing a seal
It’s time for some heavy lifting.
We have to weigh all our seals, but it’s not as easy as you think. We can’t just ask a seal to scoot itself onto a nice big bathroom scale. Instead, we use a tarp, tripod and hanging scale to weigh each seal.
First we roll up a tarp and place it next to the seal.
The next step takes teamwork. We need to get the tarp under the 750-1,000 lb. seal. Here’s how we do it. The entire team carefully rolls the seal on its side, and we scoot the rolled-up tarp next to the seal. Then one or two people quickly roll out a section of the tarp. Then we simply roll the seal back onto its belly and wrap the seal up all snug in the tarp.
Finally, we hoist the seal up and measure its weight. Phew! That’s a lot of work to weigh just one seal!
Wait, there’s one more thing. The scale measures everything we weigh – the seal, the tarp, the net and any counterbalances we use. So, as you might have guessed, we need to subtract the weight of all those extra things – this weight is called the tare - in order to find the weight of the seal.
 How we find the weight of a seal using a tarp, tripod and hanging scale. The picture on the right shows how to find the tare. In this case, I was used as a counter balance and we also weighed the tarp, so in order to find the tare weight, we had to weigh me and the tarp. Photo credit: Alex Eilers, MMPA Permit # 17411
Measuring a seal
Seals are not shaped like you and me. So, we measure them in a variety of different ways. Take a look:
 Here you can see where each measurement falls on the seal’s body. Photo credit: Alex Eilers, MMPA Permit # 17411
The first two measurements we take are curve length and standard length.
The curve length is taken on the dorsal (top) side of the seal from the tip of the tail to the tip of the nose. We also document the measurement at each of the points along the back (shown in the picture above).
The standard length is taken as a horizontal line slightly above the seal from the tip of the tail to the tip of the nose.
Next we measure girth or how big around the seal is at each of those pre-determined points. In Antarctica, skinny seals may not fare well, so bigger is often better. The problem with measuring a seal’s girth is that it’s difficult to get a measuring tape under the seal, so we use what we call floss. Similar to the floss you use for your teeth, we use a thin rope (pictured below). This rope can be gently pulled under the seal and wrapped around the seal to collect the measurement at each one of the points. Unlike the measuring tape, this rope doesn’t stretch—so we know we are getting the correct values.
 We measure how big around a seal is at several points along its body. The bigger the better! Photo credit: Alex Eilers, MMPA Permit # 17411
Our final measurement is the slumps.
What are ‘slumps,’ I thought? It doesn’t sound like anything I’ve ever measured before. And it’s not! Seals have a lot of blubber and when they are hauled out on the ice their bodies are not perfectly round like they are in the water. They slump! Take a look at the picture below. That seal is not round at all; in fact, it looks a bit like a pancake. So how do we measure the slumps, or how slumped a seal’s body shape is?
It’s easy. We measure the height and width of the seal’s body! Since the difference between these values reflects how slumped the seal is, we call the height and width values together ‘slumps.’
It is important to measure the same places on each seal so that we can compare the seals to one another. By using the same points as we did with girth and curve length, we will get the height and width of the seal. Our tools are a bit different; we use two small poles (with a measuring tape secured to each pole) and one loose measuring tape. The height of the seal is found by measuring from the belly or bottom of the seal, to the back or top of the seal. I am measuring the slumps for the neck in the picture below. The loose measuring tape is held tightly above the neck and between the poles. Keeping the loose tape measure level, the right side and left side measurements are noted and averaged. The measurements are different sometimes because the ice the seal is lying on is not always completely flat. For example, let’s say my measurement on the right side is 35.5 cm and Amy’s measurement on the left side is 36.5. We would average the two measurements and record that, making the recorded height 36 cm. The width is taken by measuring from the inside of one pole to the inside of the second pole.
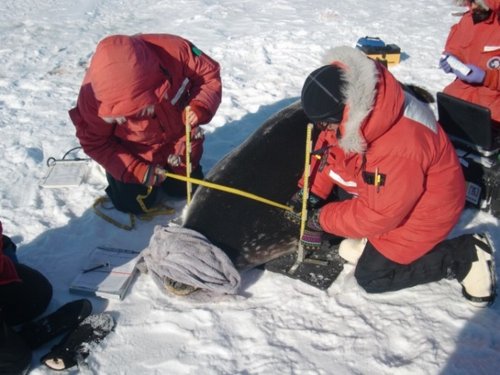 You can see the team is very careful to take accurate measurements. Photo credit: MMPA Permit # 17411
Why do we take all of these measurements?
We are trying to get an accurate estimate of the seal’s weight without using a scale.
As you’ve just read earlier, weighing a seal takes a lot of heavy equipment and sometimes we are not able to bring that equipment into the field. Measuring a seal, however, only takes a rope, a few measuring tapes and two small poles. By taking all of these measurements, we can create a 3D model of the seal to estimate its weight. Pretty neat, isn’t it!
Michelle Shero, one of the researchers on the team, created a mathematical equation for calculating the seal’s weight. And her calculation is pretty accurate, providing an estimate to within 5% accuracy. The team I work with is really impressive, aren’t they! We will talk more about this in a future journal.
More technology for measuring
We use some neat technology to measure the depth of the seal’s blubber. Do you know what an ultrasound is?
Ultrasounds can be used to look at and/or measure soft tissues in the body – like blubber. And in our case, we are measuring blubber depth. Blubber serves two main purposes for the Weddell seals: it is a source of energy, and it provides insulation. The team can learn a lot about the seal’s health by looking at its blubber.
Here’s how we do it. In the picture below, I am holding a probe in my right hand and ultrasound gel (which is like goo) in the other. I put a healthy glob of goo on the probe, and then press down at a specific point. And yes, these points are the ones we used earlier when we were measuring the seal. The only difference is that we take two blubber measurements at each point with the ultrasound—one dorsal (top) measurement and one lateral (side) measurement. In the picture below, I am measuring at the lateral pelvis point and am about to press the probe on the fur/skin. When I do, an image will be sent to the ultrasound monitor and we will be able to see the blubber depth. In the blubber depth image below, the white curve at the top (next to the green dot) is the seal’s skin. The white, horizontal line in the middle of the picture is where the blubber meets the muscle. You can see how we measured the blubber depth by drawing the white dotted line between the skin and the muscle. In this case it is 5.43 cm. Wow! That’s more than 2 inches deep!
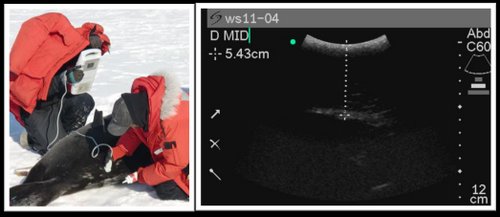 Getting ultrasound measurments. See if you can figure out where the blubber is in the ultrasound picture. I’ll give you a hint: the seal’s blubber depth is marked with a dotted line. Photo credit: Dr. Jennifer Burns, MMPA Permit # 17411
Seal samples
With all these measurements we gather, we have a pretty good idea of the seal’s health. Once we know that our ‘seal friends’ are doing okay, we take a few more samples. We also collect skin, blood, muscle, blubber, whisker and fur samples from the seals.
Blood provides information about the hormone levels. Hormones are important because they help us identify if a seal is under stress or is pregnant. Different hormones are produced during critical life events.
Blubber helps us figure out what kinds of fish seals are eating, since components of fats from the fish end up in the seal’s fat.
Muscle samples tell us about the oxygen-carrying capacity of the seal. This information lets us know how good seals are at diving. Higher oxygen-carrying capacity is linked to better diving capabilities, or the ability to dive for longer without taking a breath.
Whiskers teach us about the seal’s diet. The whiskers are fascinating because they record what the seal was eating exactly when the whisker was growing, and whiskers grow throughout the year. Therefore, we are able to examine different sections of the whisker to see what the seal was eating during a specific period of time.
Fur tells us about the stress hormones in the body. What stresses a seal out? Being hungry stresses out the Weddell seal!
 Going from left to right, top to bottom, the pictures are of skin, blood, muscle, blubber, whisker and fur samples. Photo credit: Alex Eilers, MMPA Permit # 17411
Pregnancy
Since we know seals might be pregnant in January and February, we will also use an ultrasound machine to see if they are pregnant and to take pictures and observe the growth of the embryos. With the ultrasound and a special probe, we can tell if an animal is pregnant even when the embryo is still very small. By figuring out which seals are pregnant in January and which ones are actually able to keep the pregnancy healthy and give birth the next year, we can figure out how body condition, hormones and foraging all might influence the likelihood of a seal having a pup.
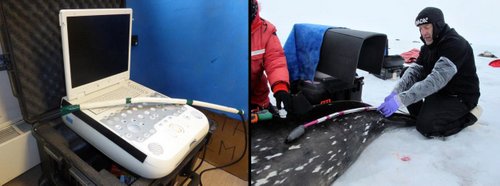 This is our special ultrasound and probe. Photo credit: Michelle Shero, MMPA Permit # 17411
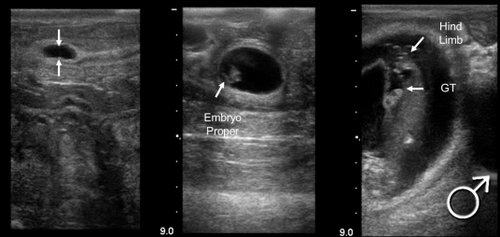 These are some ultrasound pictures of baby seals in the womb. Photo credit: M ichelle Shero, MMPA Permit # 17411


Comments