by Tiffany Green
Greetings! Tiffany here, guest blogging for Yamini. While Yamini was at her awesome sea ice training and expedition (check out blogs on 16 & 17 Dec) was offered the opportunity to attend a Deep Field Shakedown (DFS). This course takes a small group of people onto the frozen McMurdo Sound and teaches basic skills for survival and general techniques for remote field camp living. We slept in tents for one night, learned how to build an ice wall, dig a trench, and skills to keep your tent from blowing away in the wind.
DFS used to be called “Happy Camper” and was an in-depth field course that all USAP participants were required to go through. Due to time commitments and budget constraints, it has been reduced to basic survival skills. Nevertheless, I was happy to have the opportunity to learn the skills hands-on.
Packing for the Deep Field
When I found out that I would be attending the Deep Field Shakedown I started to think of what I would pack. The Field Support & Training center sent us a list of stuff they suggest we bring. First and foremost, bring all issued extreme cold weather (ECW) gear. Since we were “car camping” we were also told to bring anything to make us comfortable.
If you find yourself in a survival situation, however, you will want to take only the most critical items for staying alive (ahem, leave your Gameboy behind!).
Here is what I packed: *2 warm hats *3 types of gloves (mittens, work gloves, and glove liners) *Balaclava/gaiter/buff *Glacier glasses/goggles (polarized lenses to reduce the brightness of snow.) *2 pairs of base layers (wool/synthetic, no cotton!) *1 pair of mid layers (fleece pants, fleece pullover) *1 pair of outer layers (snow pants, down coat) *3 pairs of wool socks *1 pair of bunny boots *Toiletries (tooth brush, tooth paste, lotion, eye drops, hand sanitizer) *A book *Alarm clock *Ear plugs (for drowning out the wind and flapping tents) *2 lunches
They provided us with all of the other camping equipment and group gear: *1 sleeping bag *1 fleece sleeping bag liner, aka “cozy” *2 foam sleeping pads *Tents *Shovels *Ice axes *Saws *Snacks, dinner, breakfast.
 A balaclava covers your head, face and neck, leaving a hole to breathe. You'll be warm and feel like a ninja! Photo credit: Tiffany Green
 A buff is a thin alternative to a balaclava. It provides less warmth, but keeps your nose and mouth protected from breathing in cold air. Photo credit: Tiffany Green
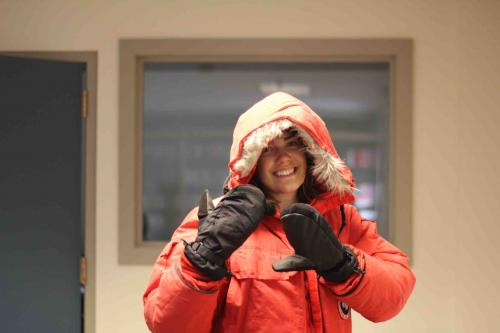 A good pair of mittens and Big Red (or another warm down-filled coat) are essential for any Antarctic outings!
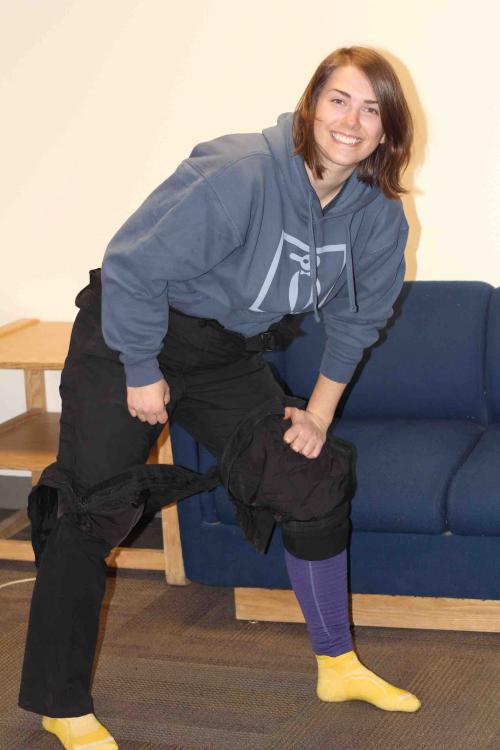 There are three layers of pants here – a baselayer (purple), a midlayer of soft shell pants (on Tiff's right leg), and Snow pants above.
 Tall, thick wool socks to keep the toes nice and cozy!
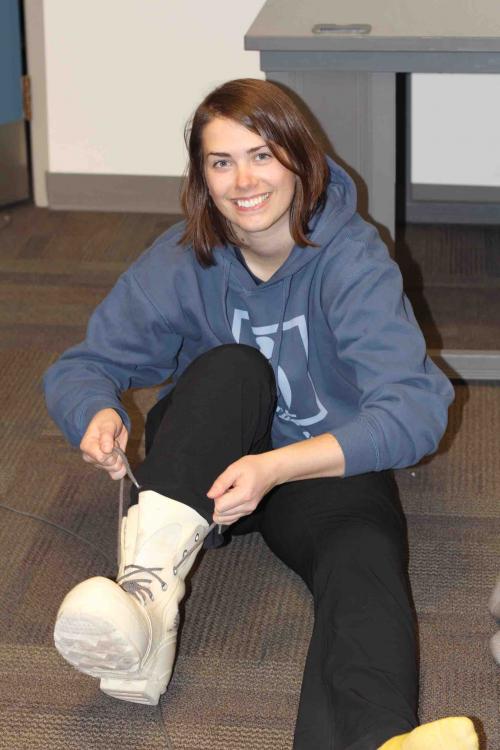 They may look funny, but they are great at keeping your feet dry in the snow and warm in the cold.
Class begins!
At promptly 10am we filed in to the classroom at the Science Support Center. We met our awesome instructor Susan, and the other 7 people we would be spending the next day and a half with.
Our first task of the day was to learn how to tie a special knot for securing our tent – the trucker’s hitch.
This knot is special because it is very secure, but still easy enough to tie and untie with gloves on. This is very important! The more time your skin is exposed to the cold and wind, the greater your chances for frostbite. Don’t be fooled, it happens faster than you think!
To learn how to tie a Trucker's Hitch for yourself, visit this link for a step-by-step guide! http://www.backpacker.com/view/photos/skills-photos/knot-tying-learn-the-quick-release-trucker-s-hitch/#bp=0/img1
After we mastered the art of knot tying, we loaded up the PistenBully and headed out to camp.
Moving to Camp
 Our chariot, the PistenBully, from the outside. Photo Credit: Tiffany Green
 A view from inside the PistenBully as we rode out to camp! Photo Credit: Tiffany Green
It was probably about a 30-minute drive to Snow Mound City, the official name of our camp.
When we arrived we saw a vast expanse of white, met with the pale blue sky in one direction, and towering volcanoes in the other. We could still see specs of buildings in the distance, though it was hard to tell exactly how far they were since there is nothing to compare for scale.
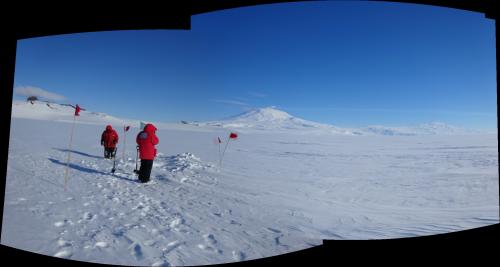 This panoramic shot shows (from left to right) Castle Rock, Mt. Erebus, Terra Nova, and Mt. Terror in the distance. Photo Credit: Tiffany Green
Our instructor, Susan, set us to work right away.
Conditions were beautiful that day, but weather is known to change very quickly in Antarctica and we saw a suspicious set of grey clouds approaching from behind Mount Erebus, Mount Terra Nova, and Mount Terror.
 Here’s a map of our approximate location. The star could be off a bit. It’s hard to determine exactly where you are without a GPS! Photo credit: NASA
Building a Snow Wall
Our first task was to build a snow wall.
We began by planning our site for efficiency. You should be somewhat familiar with your surroundings, including major geographic features or landmarks (i.e. mountains) and prevailing weather patterns. At this location, the worst weather can usually be seen approaching from Minna Flats, to the South.
For this reason, we decided to build our snow wall facing the Flats. You always want to put your snow wall perpendicular to the worst weather. This will help reduce the amount of wind and drifting onto your tent.
With a plan in hand we set to work digging a snow block quarry. The quarry is the location that you will be digging all of your snow blocks from. You want it close enough to your snow wall that it’s easy to carry the blocks, but far enough so you don’t accidentally fall into it. Be sure to put a flag or marker of sorts by your quarry so you can see it if white out conditions occur.
Instructions for a snow wall and snow block quarry:
Etch lightly on the snow where you want to make your cuts. This helps keep the blocks a regular shape. Start with etching a large corner, and then eyeball the size of blocks. They should be small enough to carry, but big enough so that it doesn’t take an extraordinary amount of time to build the wall.
Cut each of the blocks using a saw. To make sure you have a smooth, clean block, re-cut the block in the opposite direction. It helps to dig a trench on two sides of your quarry so you can have leverage to pry the blocks out.
 Visualization of the snow block quarry. Photo Credit: Tiffany Green and Erin Pettit
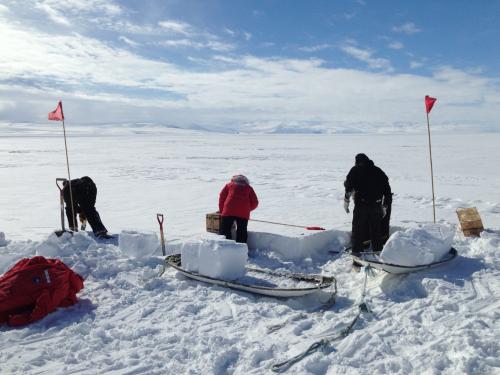 Team members cut out blocks of ice and drag them to the snow wall on sleds. Photo credit: Merlin Mah
Next, assemble the wall. Start in the middle and work your way out on either side. This helps keep the wall even, and if you have several people both sides of the wall can be built simultaneously.
 This panoramic shot shows both the snow wall as it is being built and the snow block quarry as it is being cut. Photo credit: Merlin Mah
Minimize gaps between blocks by trimming the sides to an even surface, parallel to each other. Trim the top of the wall to make it even after the whole row is in place.
Repeat the process until your wall is about 4 feet high.
 The final product! Photo Credit: Tiffany Green
We were very proud of our snow wall. The wind was picking up by the time we finished, so we were grateful for the shelter it provided.
Oddly, the prevailing wind on that day happened to come from the opposite direction. We had already set up a few tents on the wrong side, but we positioned our kitchen/hangout area out of the wind instead.
While the rest of the crew set up the remaining tents I asked Susan to teach me how to dig a trench.
My Snow Trench
The very first thing you want to do is plan your trench. Susan told me about two ways to build a trench. The first was to use a few thin, long snow blocks to create an A-frame roof. The second involved the use of a sled as a roof. I started out attempting the A-frame, but my blocks kept breaking in inconvenient places, so I went with the sled trench instead.
I began by tracing an outline of the sled in the snow. I started to dig just inside this trace to make sure the sled would sit on top without falling in. A few friends came over periodically to check out the progress and offer a hand with digging. One gentleman helped me dig a cold sink – an area at the entrance of the trench that is slightly deeper than the trench itself so cold air would settle and warm air would stay in the trench. Another gentleman helped out by digging stairs, and a third helped me even out the floor of the trench. Thanks Kip, Casey, and Clay!!
When I was happy with the depth (I dug about 3 feet until I reached hard, icy snow) I began hollowing out a wide hole using a saw (to make the initial diagonal cuts) and ice axe (to remove snow after cuts were made).
 View of the trench from the side. Rather than digging straight down (like a coffin), edges are rounded to give inhabitants more elbow room! Photo Credit: Tiffany Green
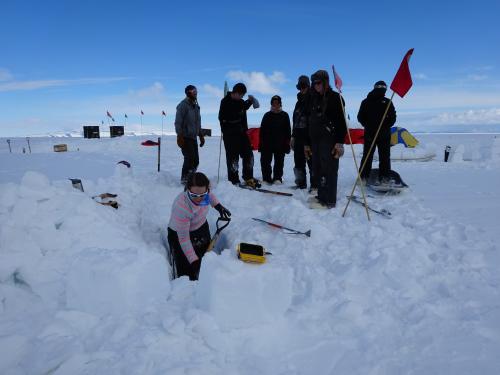 The team stands around offering moral support while I am hard at work, digging the trench! Photo credit: Michael Kippley
After a quick dinner break I returned to put the sled roof on. By this time the wind was blowing intensely and I was starting to get chilled. I cleaned out a sled and gently flipped it over onto my trench.
OH NO! It didn’t fit at one end and kept collapsing in! I tried a few tricks to make the sled fit that didn’t end up working.
Staying Safe and Warm
As I sat, pondering how to fix my trench, I realized how cold I was getting. The tips of my fingers were getting cold and I was chilled from my sweaty clothes. Recognizing that I would probably get even colder at a rapid rate I ran to the outhouse to change into warm, dry clothes. As I did so, I realized that my trench might be a lost cause; if I continued to work on it I’d get wet again and I only had a few extra pieces of dry clothes.
I reluctantly called it quits on the trench and moved in to one of the spare spots in the tents. I told the group what had happened and a few of them went over to fix it, which they managed to do using bamboo stakes in the walls to hold the sled up. GENIUS! Nevertheless, I stuck with my decision to sleep in the tent.
 Looking up at the sled roof from the inside of the trench. Photo credit: Merlin Mah
The next morning I heard that one of our team members, Merlin, couldn’t sleep because of the bright sun and flapping of tents against the wind, so he told his tent mate that he was going to try to sleep in the trench. The next morning his tent mate went to check on him and found that the trench opening had been closed by drifting snow! After he was dug out, Merlin reported was that the trench was warm, dark, quiet, and he slept quite well. He woke up before his tent mate dug him out, but knew that he would be checking on him and digging him out soon.
 The trench I so painstakingly dug was filled in by morning, except for a small part where the sled rested! Photo credit: Tiffany Green
Merlin used one of the most important pieces of information Susan gave us. ALWAYS tell people where you are going, what you are doing, and how long you will be. If the activity permits, bring a friend. If you decide to take a walk from camp, bring a friend or tell someone your exact route and stick with it.
Avoiding Heat Loss
Some other key tips we learned from Susan involved heat loss. There are four major types of heat loss: conduction, convection, evaporation, and radiation.
Conductive heat loss occurs from sitting/laying on the cold ground.
We reduced this type of heat loss by sitting on objects, like food boxes, using two sleeping pads, wearing lots of layers, but not so many that they become tight and cut off your circulation. Doubling your socks is not always a good idea; only do it if space in your shoes permits and the socks are not tight.
Convective heat loss occurs from wind penetrating your warm layers, removing the buffer of warmth that surrounds you like a personal cloud.
We reduced convective heat loss by using our wall to shield us from the wind and again, wearing appropriate layers.
Evaporative heat loss is from sweating and heavy breathing. As moisture from your body (like sweat) evaporates, it requires heat from your body to drive the transition from liquid to gas. This form of heat loss can be reduced by wearing the right clothing, including vapor barrier fabrics.
Heat loss via radiation happens when you are missing an essential layer, like a hat or gloves, and your body gives off essential heat.
It is also worth noting that eating and drinking regularly can help keep you warm. Your body is using a lot of energy to supply heat to your core and extremities, so you need to give it enough fuel to keep going.
Employing our new knowledge, all of us were able to stay warm, dry, and comfortable in the field.
 All seven happy campers! Photo credit: Susan Detweiler
I had a lot of fun at Snow Mound City and learned a lot of handy survival skills; all of which I will be practicing while we are at WAIS Divide.
Please keep in mind that I am relaying the beginner basics of cold weather survival. Practice your survival skills with a trained survivalist or somewhere you have the option to go inside and get warm if needed.

